Syringe Pump Project: Linear Actuator
Details
- About This Project
Syringe pumps are motor-driven precision pumps that deliver precise amounts of fluid, typically in medical environments. They operate using a motor to drive a plate forward, pushing a syringe plunger and expelling the fluid at a specified rate. While commercial syringe pumps can be quite expensive, this prototyped design offers a cost-effective alternative, requiring about $200 in materials. This fully programmable syringe pump design allows for the usage of two different syringe barrel sizes and includes features such as a forward/back and adjustable knob for controlling the fluid flow rate. This syringe pump is capable of 1 µL/min to 10 mL/min.
- User Operation Instructions
To operate the syringe pump at a given flow rate, first, input the syringe size and desired flow rate into the Arduino code. Upload the code to the Arduino, then plug the syringe pump into the wall outlet. Ensure the lid of the enclosure is properly secured down, and the syringe is placed properly in the pump. If slight adjustments to the carriage position need to be made, do so with the forward and reverse buttons on the control panel. Once the user is ready to dispense, click the start/stop button once, and the syringe pump will begin operating at your desired flow rate. The LED will turn green when in motion. To slow the constant flow rate of the syringe pump, turn the potentiometer knob counterclockwise. When the user has dispensed the desired amount of fluid, press the start/stop button again to pause the motion of the carriage; the LED should turn yellow when paused. If the pump is allowed to dispense the total volume of the syringe, the pump will automatically stop operating, and the LED will turn red. Use the forward and reverse buttons to readjust your carriage to the desired position, then unplug when finished operating.


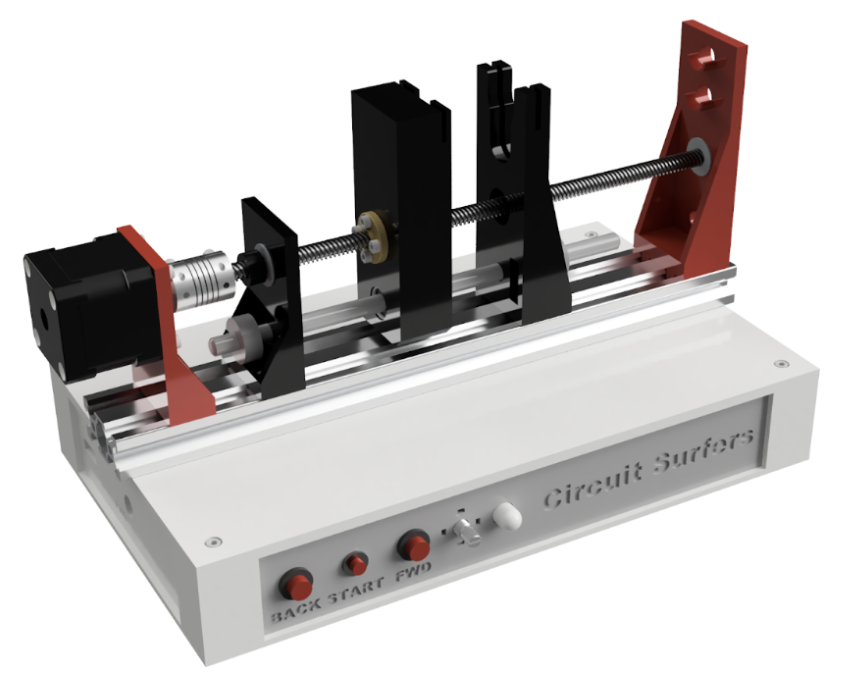
CAD Model
Arduino Code
Attatched is the file to the Arduino code to operate the Syringe Pump.
Table 1
Parts Required to Purchase
| Part Name | Quantity |
|---|---|
| Power Supply 24V | 1 |
| A4988 Stepper Driver | 1 |
| Arduino Uno | 1 |
| Circuit board | 1 |
| RGB Common Cathode LED | 1 |
| 10K Potentiometer | 1 |
| M10 Button | 1 |
| .5” ANSI Unified Button | 2 |
| NEMA 17 Motor | 1 |
| 2048 Aluminum Extrusion 1” | 4 |
| Lock Collar Lead Screw | 1 |
| Alloy Steel Cup Set Screw | 1 |
| Lock Collar Linear Rod | 2 |
| Flexible Coupler | 2 |
| Flanged Ball Bearing | 1 |
| M3*10mm Bolt | 10 |
| M5*8mm Bolt | 4 |
| LMUU Linear Bearing | 1 |
| M3 Heat Set Insert | 4 |
| Nut Tr8*8 | 4 |
| M5 Tee nut | 4 |
Table 2
3D Printed Components Required
| Component Name | Quantity |
|---|---|
| Electrical Enclosure Side Panels | 4 |
| Electrical Enclosure Top and Bottom Panels | 2 |
| Motor Mounting Plate | 1 |
| Linear Carriage | 1 |
| Syringe Barrel Support Plate | 1 |
| Syringe Nozzle Support Plate | 1 |
| Syringe Nozzle Support Plate | 1 |